Cash Management on Applova POS

Supported On: Standalone Businesses
Supported From: Applova POS (1.75.0.RELEASE)
What is Cash Management?
Cash management involves tracking and managing cash transactions in a business which includes handling cash sales, managing the initial cash placed in the cash drawer at the beginning of a shift or a business day, balancing the cash drawer, and reconciling at the end of each shift or day. This helps to avoid mistakes, prevents mismatches, and reduces the risk of theft or loss by giving real-time updates and control over cash flow.
This feature allows to start and close the cash drawer, track cash inflows and outflows, view transaction history and remotely view summaries of multiple cash drawers.

Only a Store Manager, Lead, or a custom POS user with the necessary permissions can access the Cash Management feature.
Step 1
Sign into "Applova POS" with the credentials of your business.
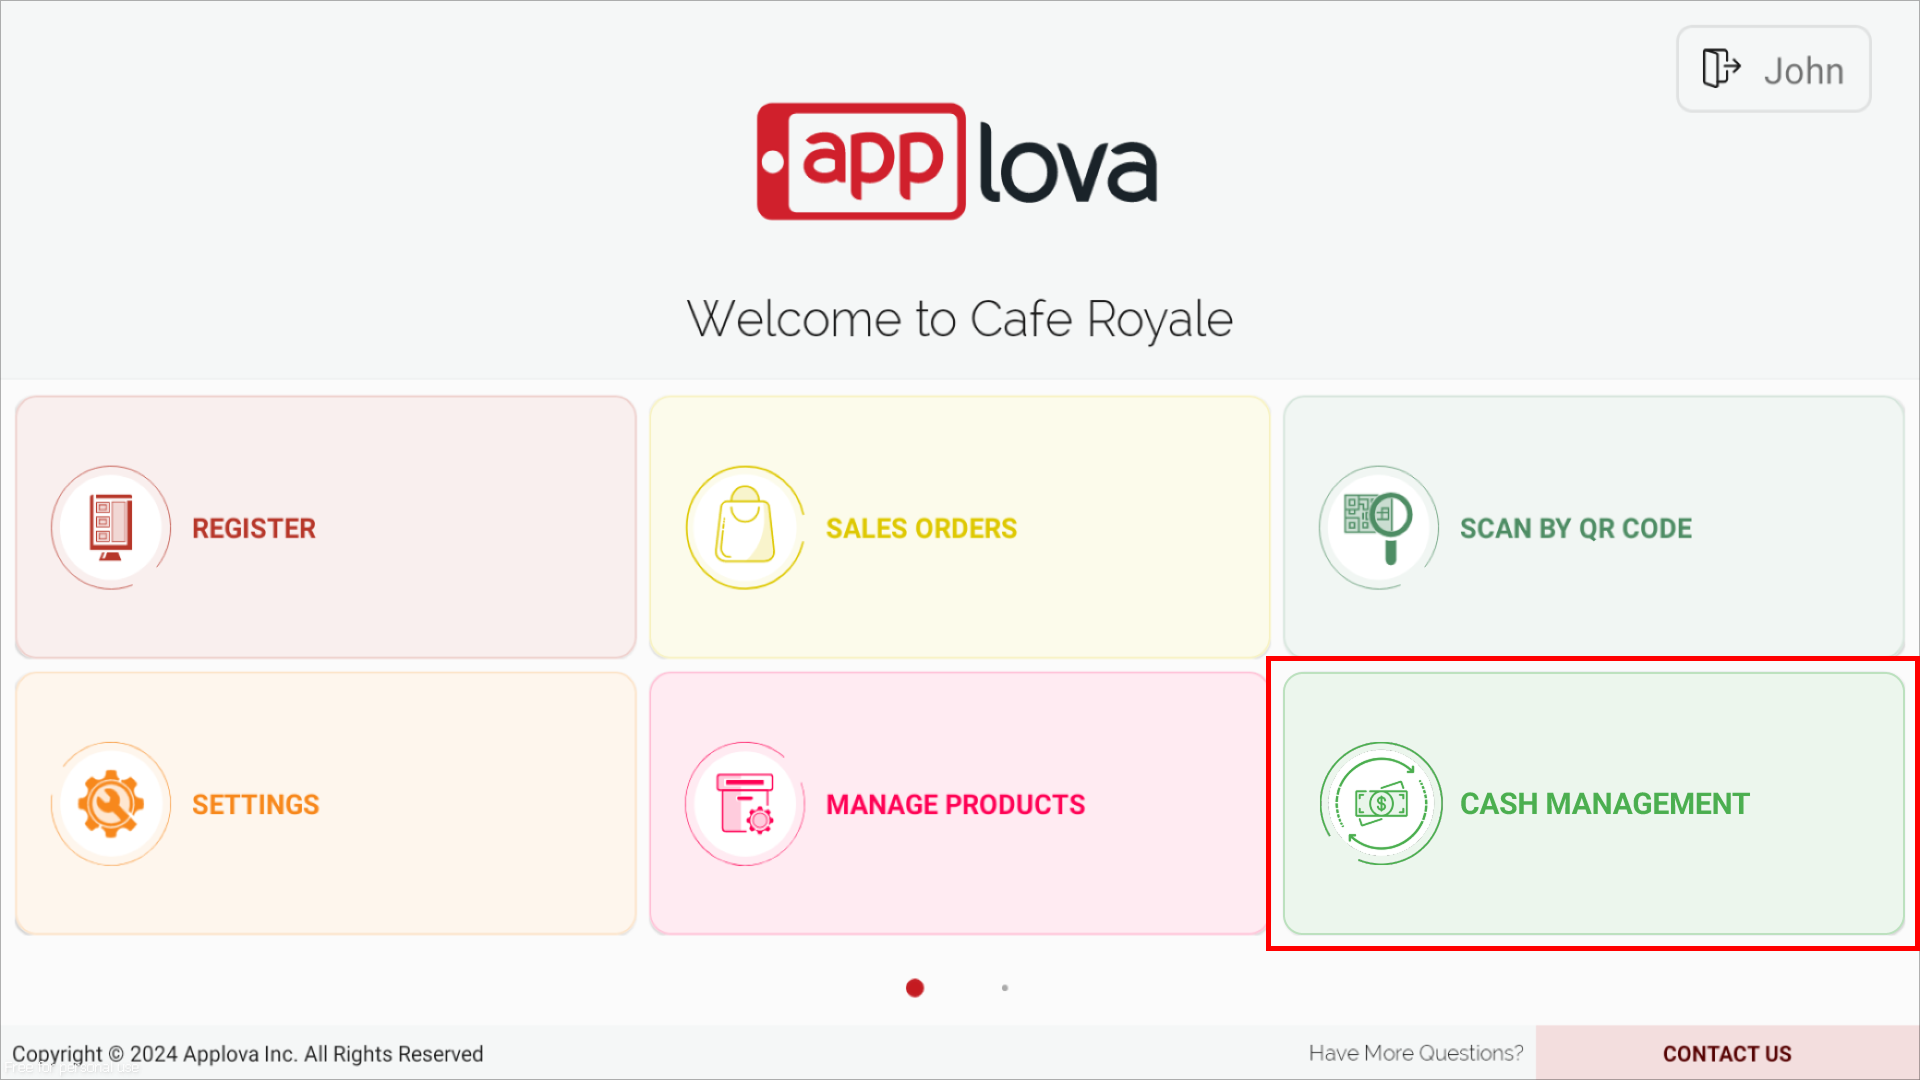
Step 2
Tap on "Cash Management" on the dashboard.
How to Start a New Cash Drawer?
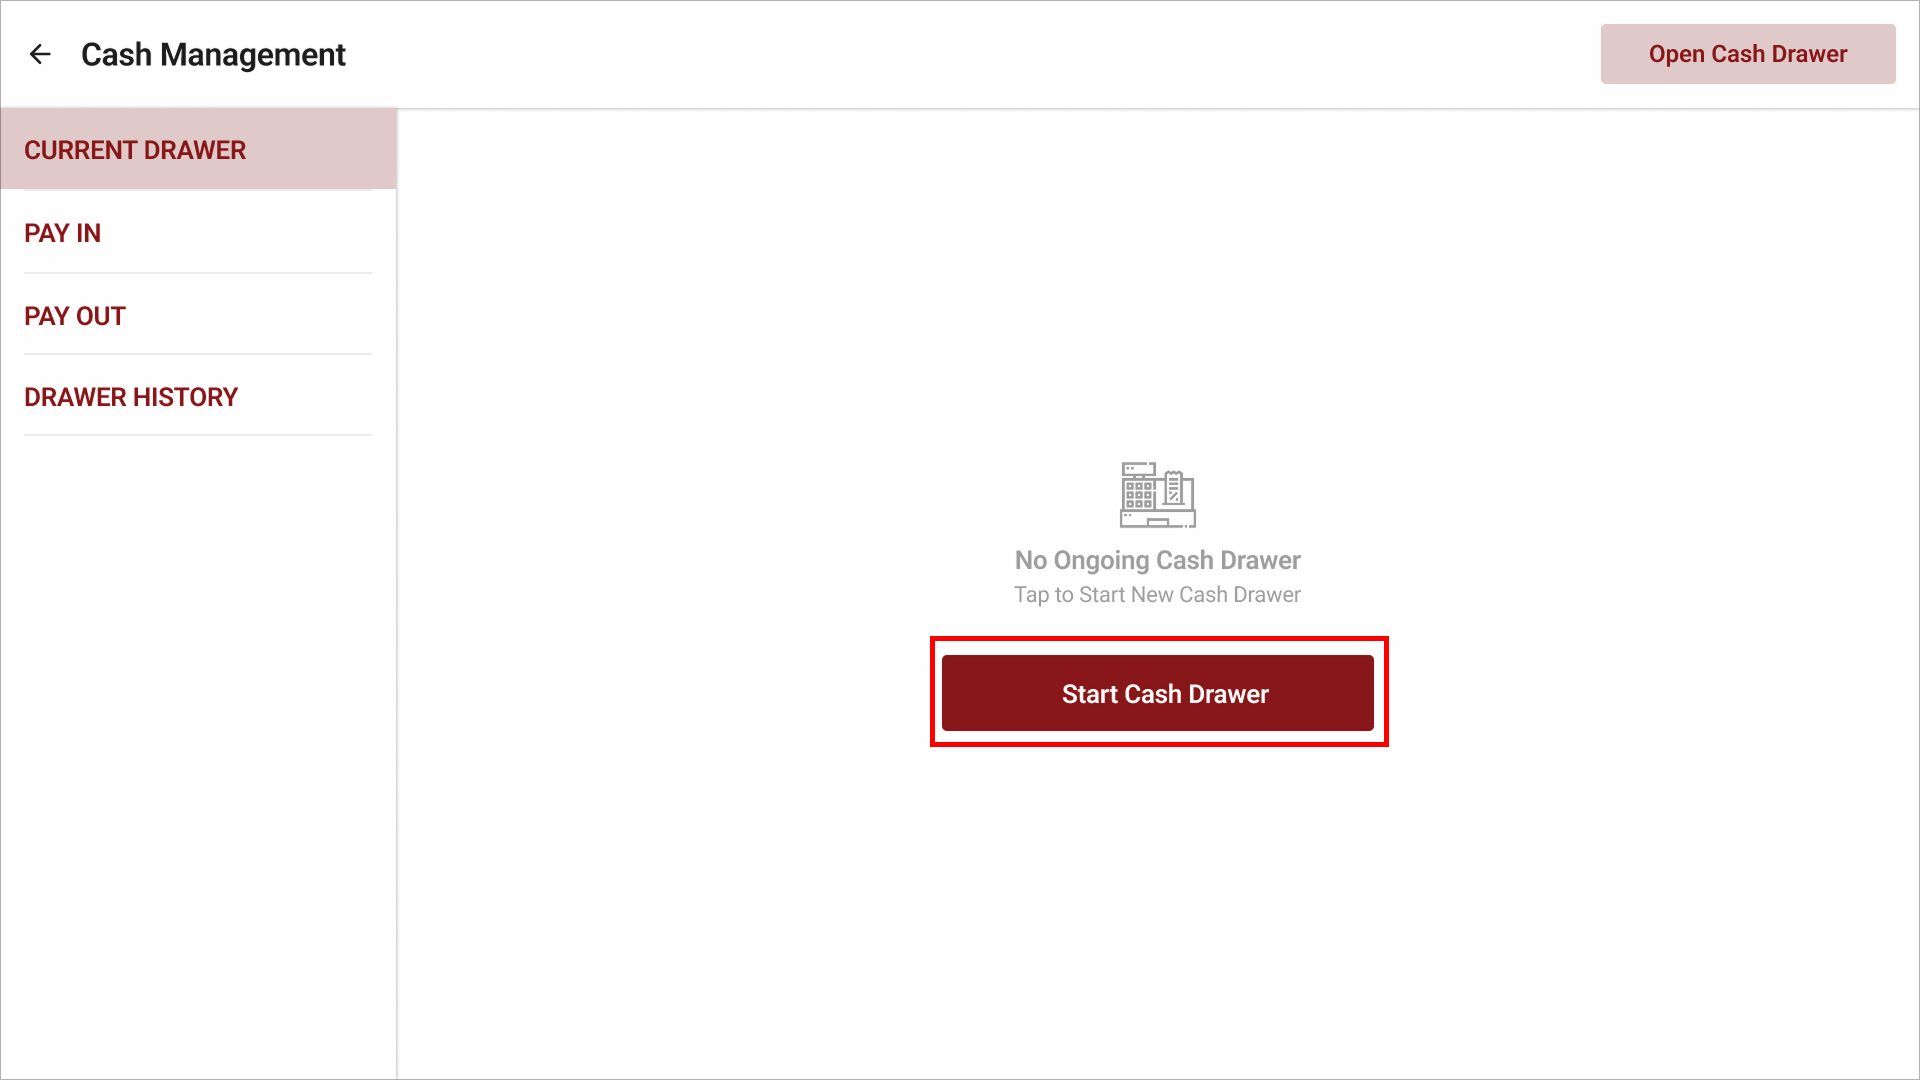
Step 1
Under the "Current Drawer" section, tap on the "Start Cash Drawer" button to initiate a new cash drawer. The physical cash drawer will open simultaneously when tapped on the "Start Cash Drawer" button.
If there's no cashdrawer active currently, "No Ongoing Cash Drawer" message will be displayed under the "Current Drawer".
Step 2
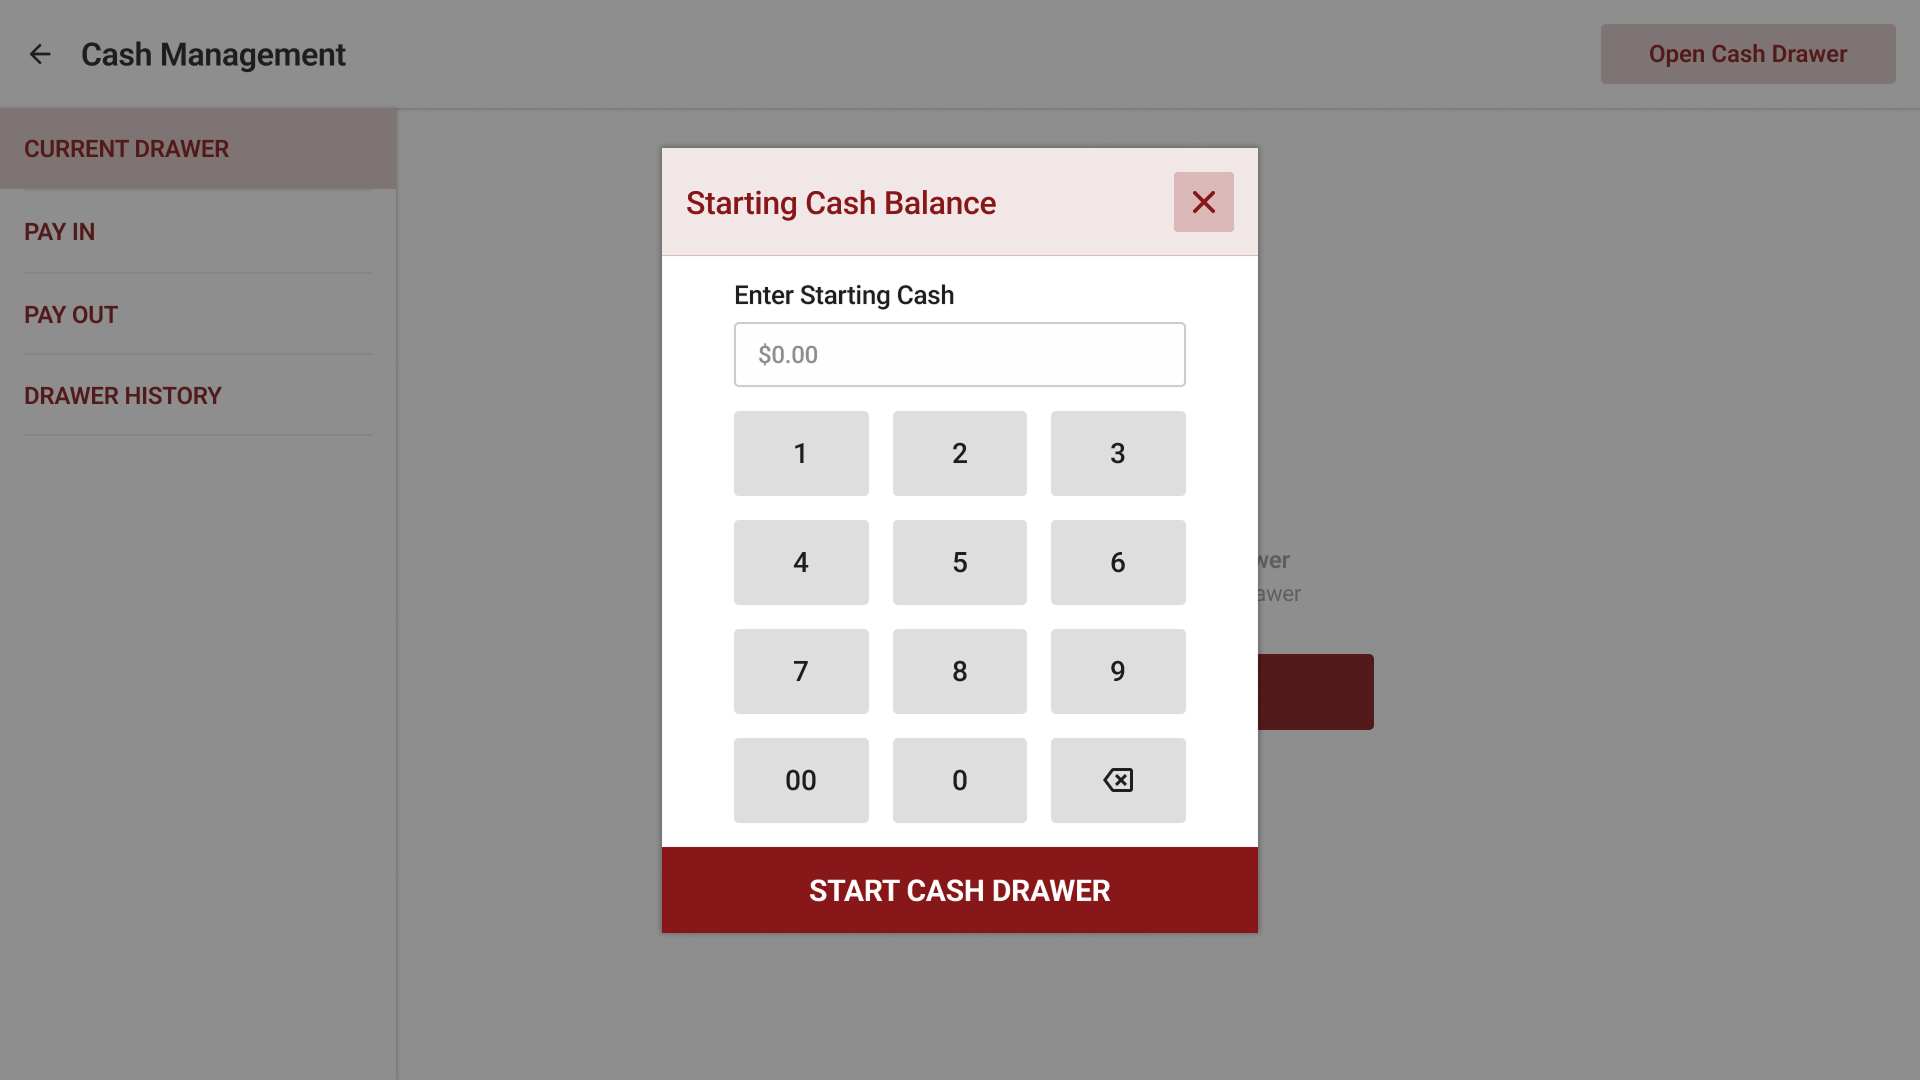
Enter the starting cash balance and tap on "Start Cash Drawer" to initiate the drawer.
Step 3
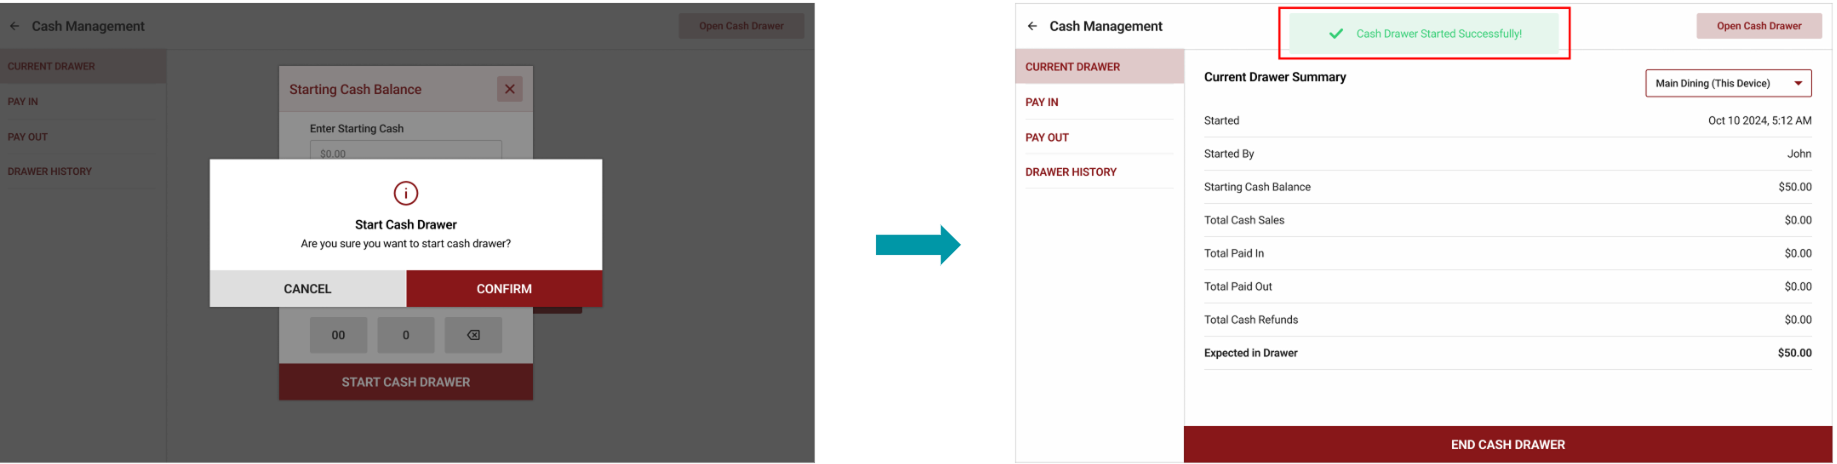
Then, tap on "Confirm". Once confirmed, a success message will be displayed as follows.
If a Cashier attempts to place an order through the register without the cash drawer being initiated, a message will appear after selecting "Charge Now", prompting the user to initiate the drawer by entering the starting cash amount.
Step 4
If the cash drawer needs to be opened manually, tap on the "Open Cash Drawer" button on the top right hand corner.
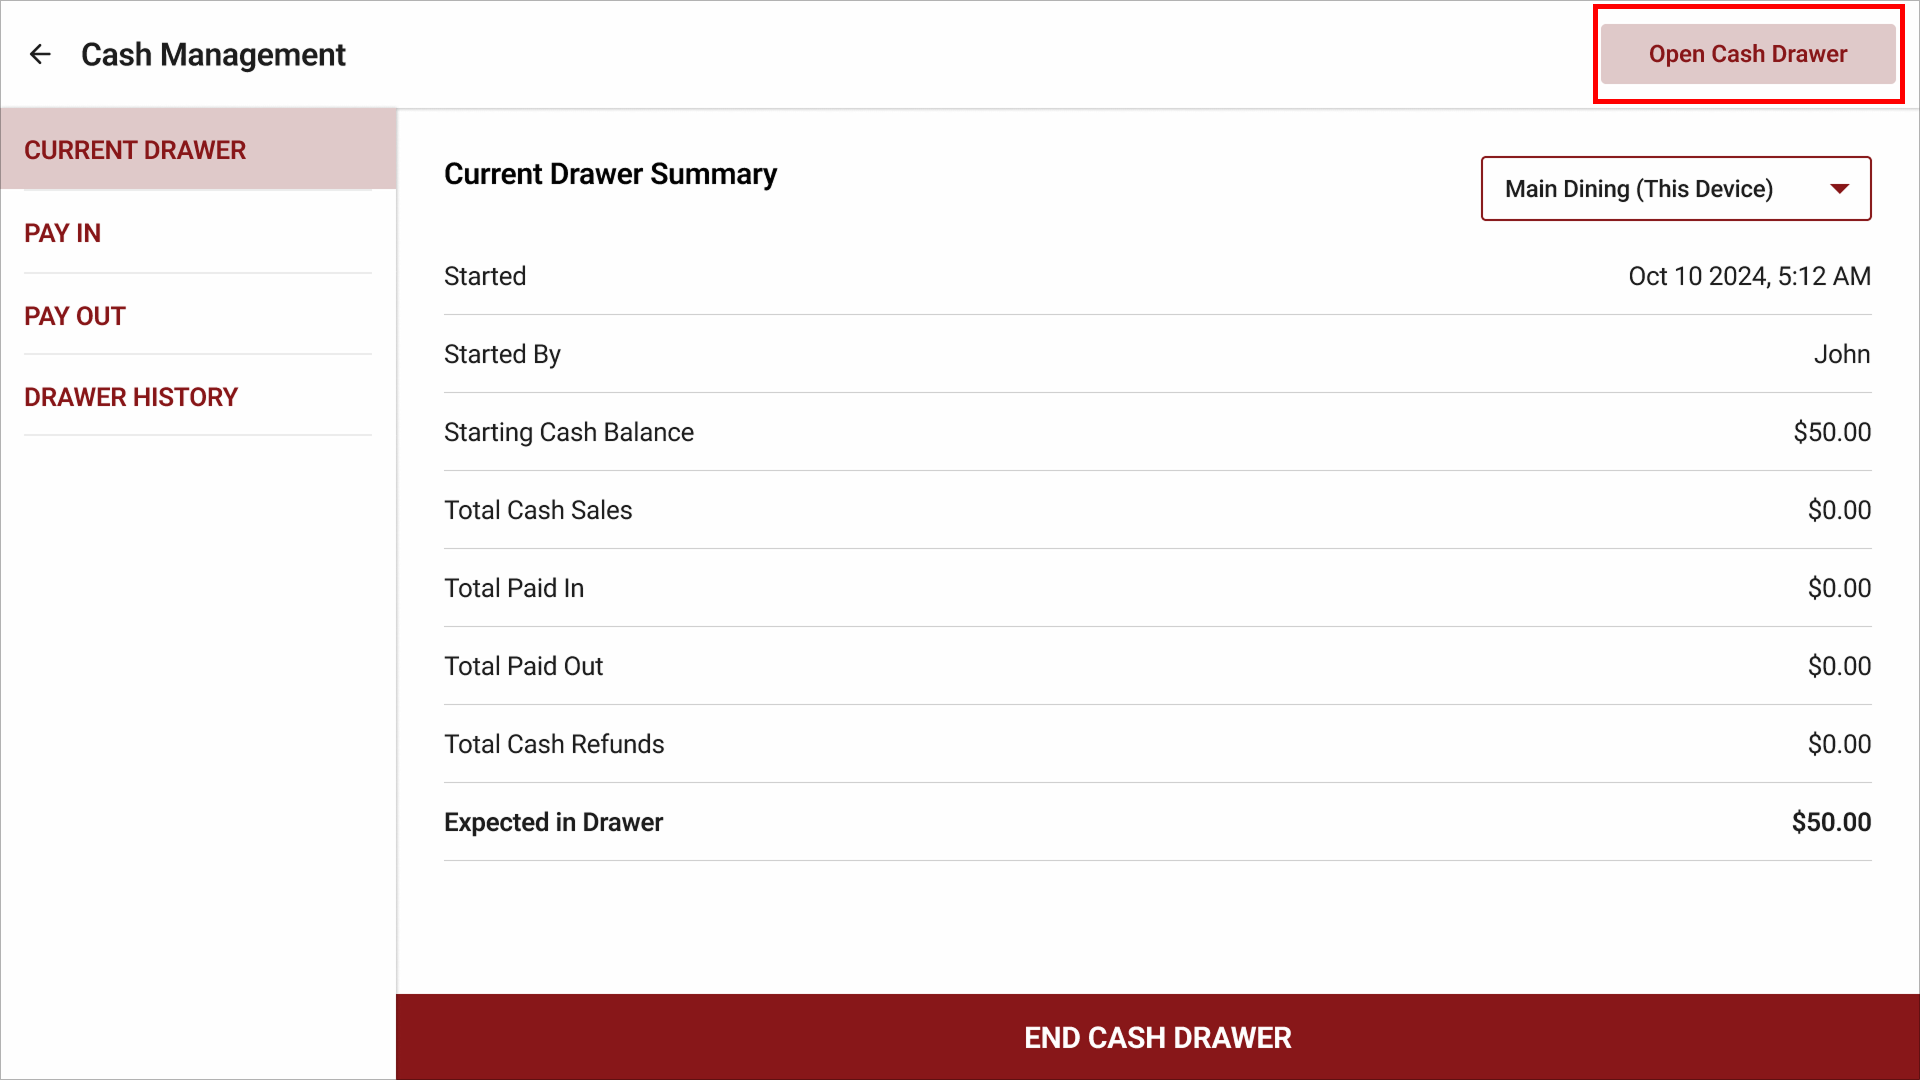
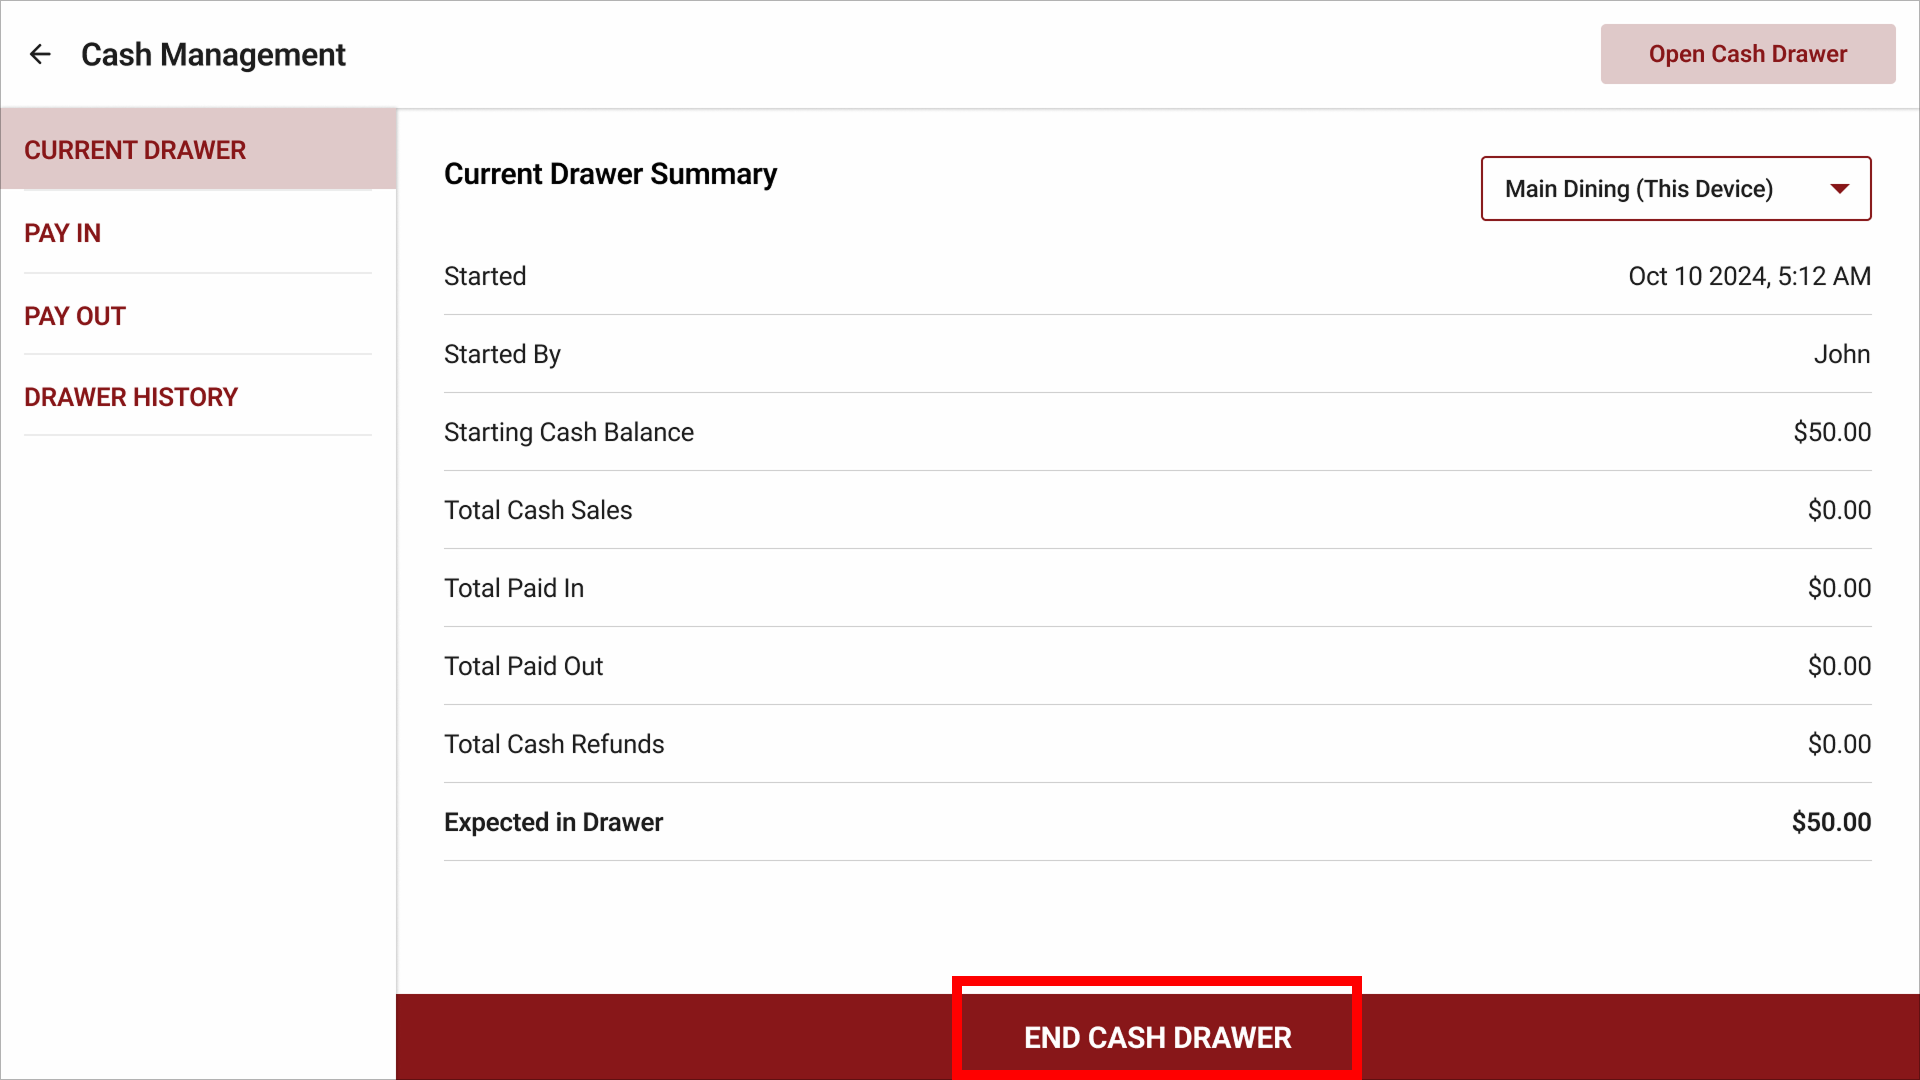
Once the drawer is started, the following summary will appear under the "Current Drawer" section.
- Started: The date and time the cash drawer started
- Started By: The employee who started the cash drawer
- Starting Cash Balance: The amount entered by the user when starting the cash drawer
- Total Cash Sales: The sum of all cash sales associated with the cash drawer from the time it initiated
- Total Pain In: The sum of all cash paid in associated with the cash drawer
- Total Paid Out: The sum of all cash paid out associated with the cash drawer
- Total Cash Refunds: The sum of all cash refunds associated with the cash drawer
- Expected in Drawer: All cash sales associated with the cash drawer, plus any cash paid in while deducting cash refunds and any cash withdrawals
Expected in Drawer = Starting Cash + Total Cash Sales + Total Paid In – Total Cash Refunds – Total Cash Out
Cash In / Pay In
The Cash In or Pay In feature allows authorized users to manually add money to the cash drawer that are not related to sales transactions such as;
- Funds added to increase the change available
- Petty cash deposits
- Additional funds introduced from other sources
Step 1
Go to the "Pay In" section and enter the amount to be added to the cash drawer.
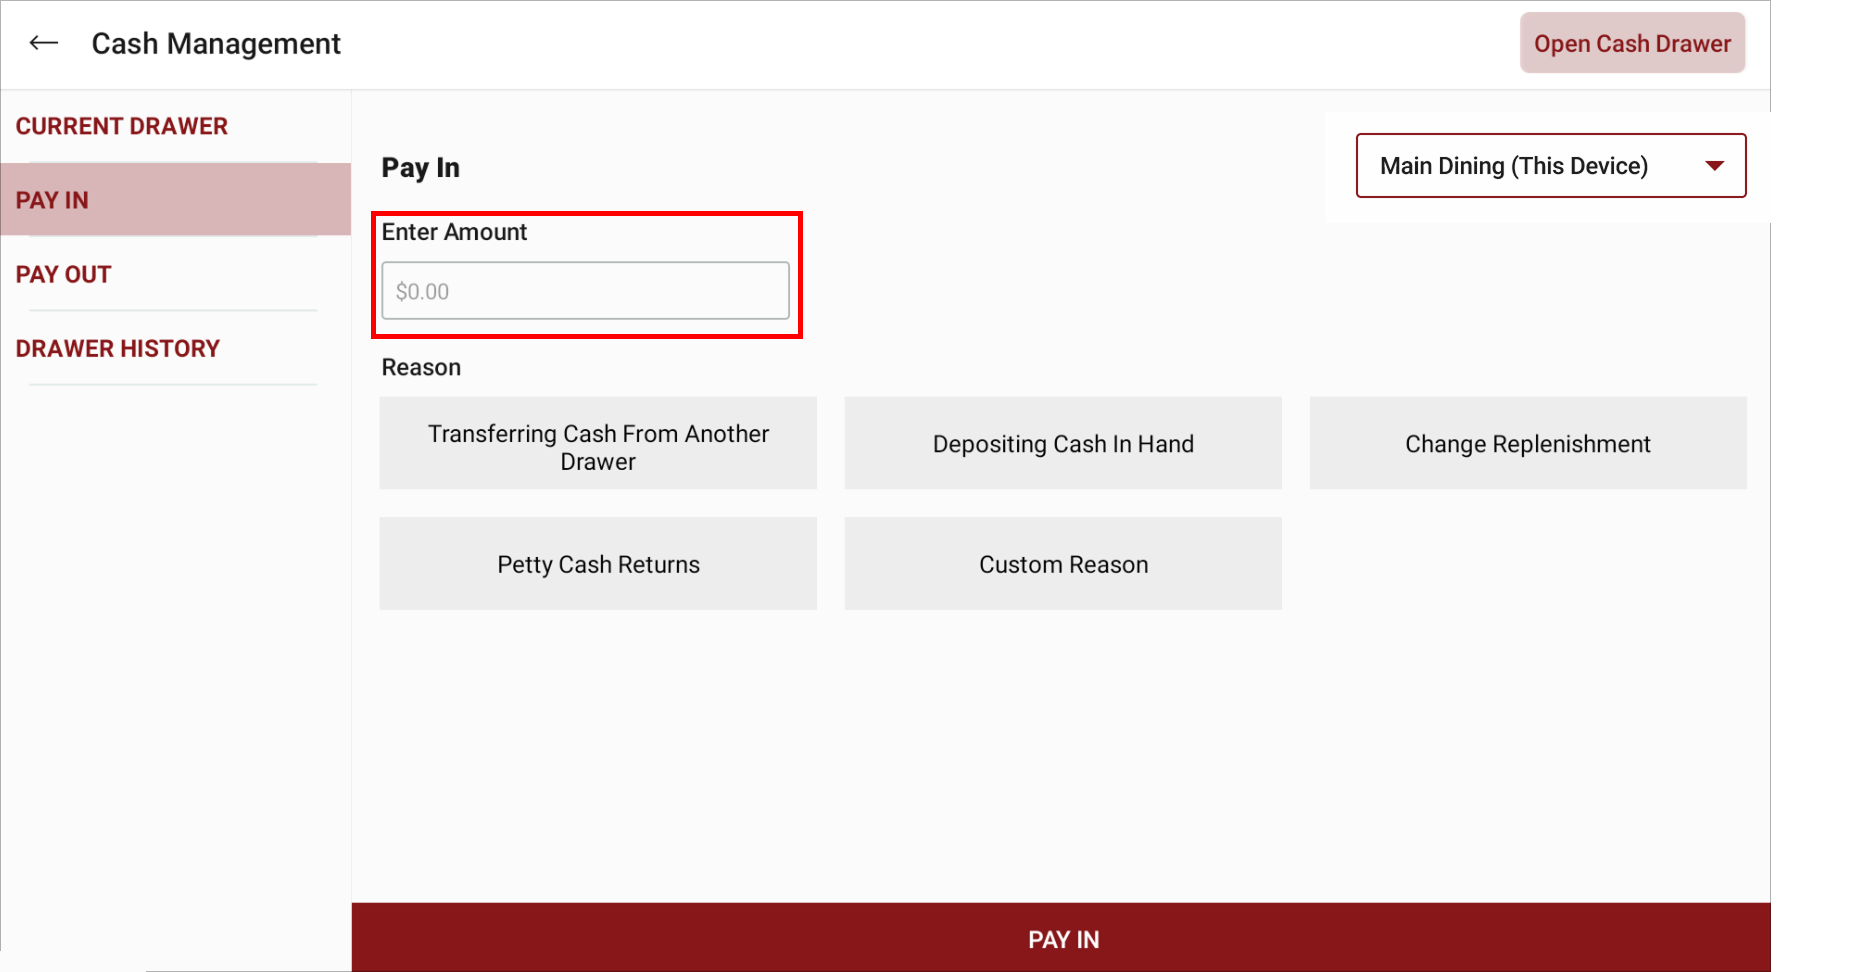
Step 2
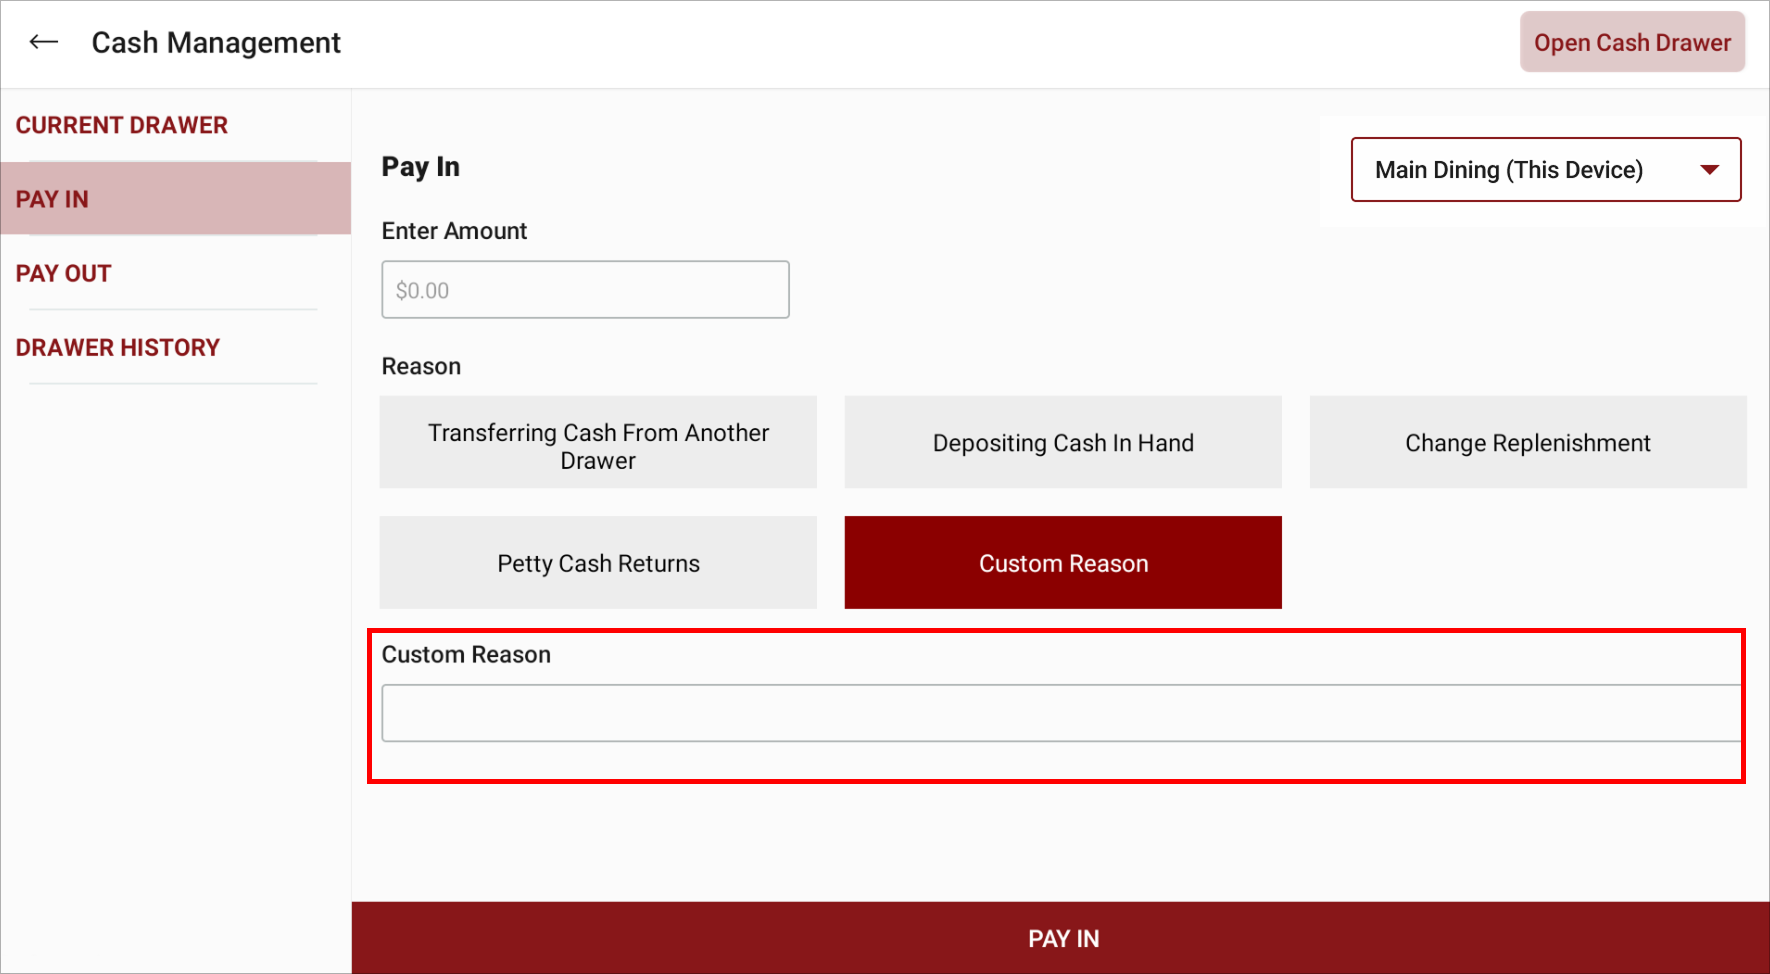
Tap on a reason for adding cash to the drawer. If the user wishes to add a reason other than the predefined reasons, tap on "Custom Reason" and type in the reason.
The user will not be allowed to proceed without providing a reason
Step 3
Tap on the "Pay In" button to add the cash in to the cash drawer and tap on "Confirm".
Cash Out / Pay Out
The Cash Out or Pay Out feature enables the manual withdrawal of cash from the cash drawer for non-sales purposes such as;
- When cash is used to pay a vendor, supplier, or employee directly from the drawer.
- Reducing excess cash in the drawer by moving it to a secure location (a safe or deposit in the bank)
- Taking cash for small business expenses or miscellaneous needs.
Step 1
Go to the "Pay Out" section and enter the amount to be withdrawn from the cash drawer.
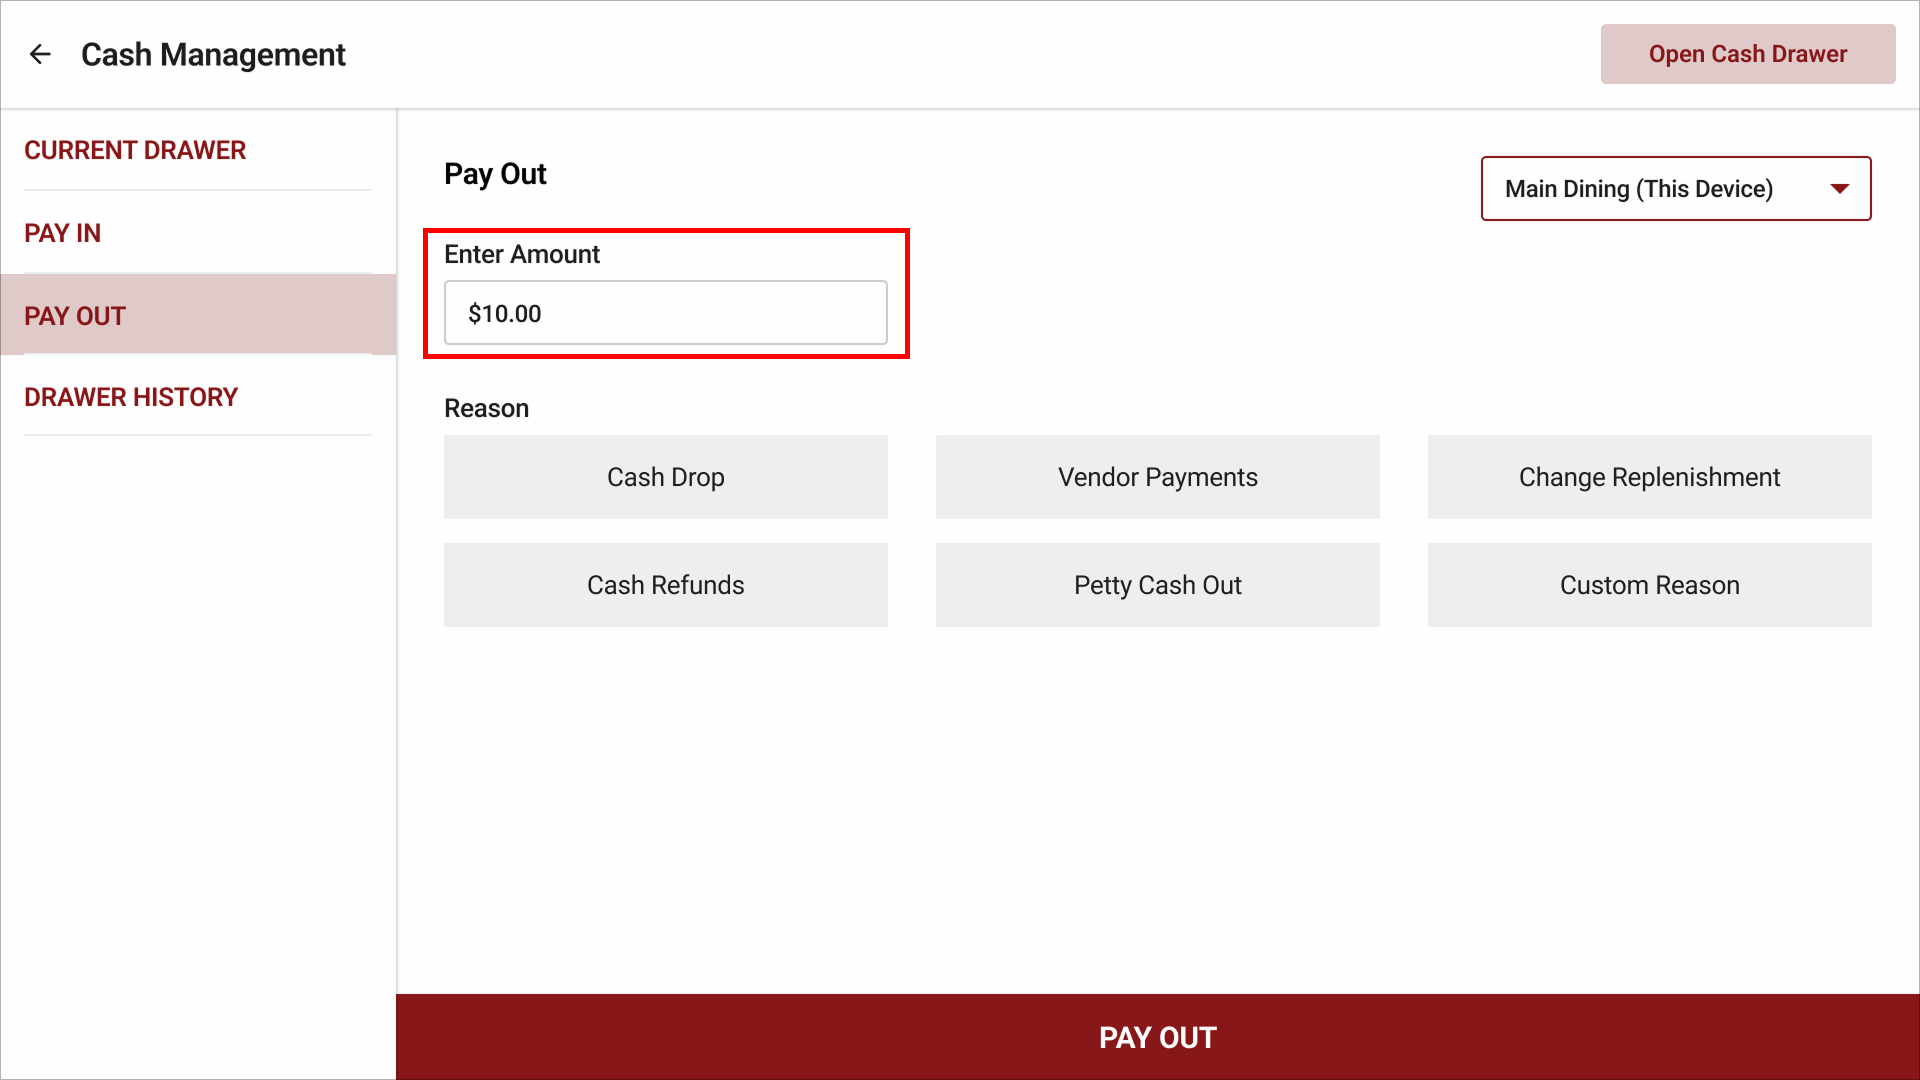
Step 2
Tap on a reason for withdrawing cash from the drawer. If the user wishes to add a reason other than the predefined reasons, tap on "Custom Reason" and type in the reason.
The user will not be allowed to proceed without providing a reason
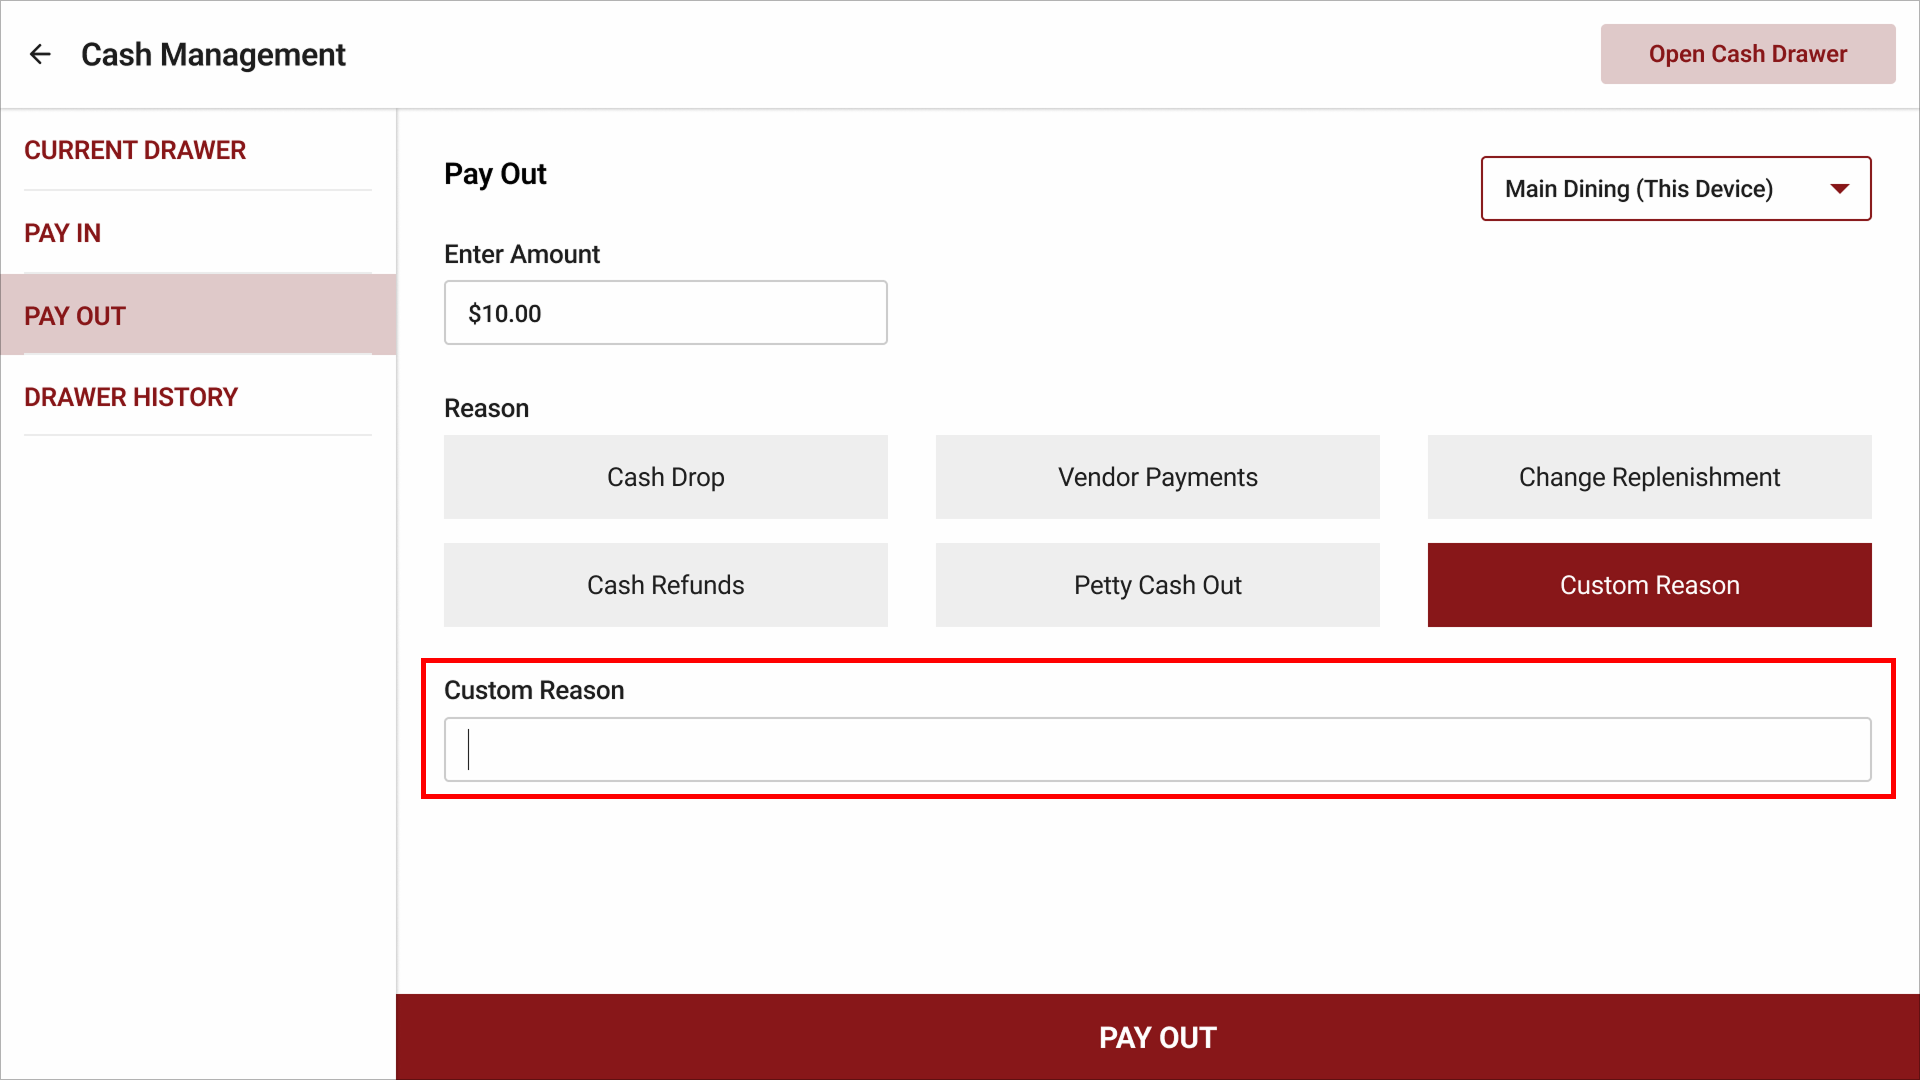
Step 3
Tap on the "Pay Out" button to withdraw the cash from the cash drawer and tap on "Confirm".
How to End the Cash Drawer?
Ending the cash drawer refers to the process of closing out the cash drawer at the end of a shift or a business day. This process involves counting the physical cash in the drawer and comparing it with the system’s recorded total to ensure accuracy and accountability and prepare the drawer for the next shift or day.
Step 1
Go to the "Current Drawer" section.
Step 2
Tap on "End Cash Drawer" button to open the physical cash drawer.
Step 3
In the prompt that appears, enter the actual cash amount in the drawer.
- If the actual cash in the drawer is less than the expected amount, the discrepancy will be displayed as "Difference".
- If the actual cash matches the expected amount, the "Difference" will not be displayed.
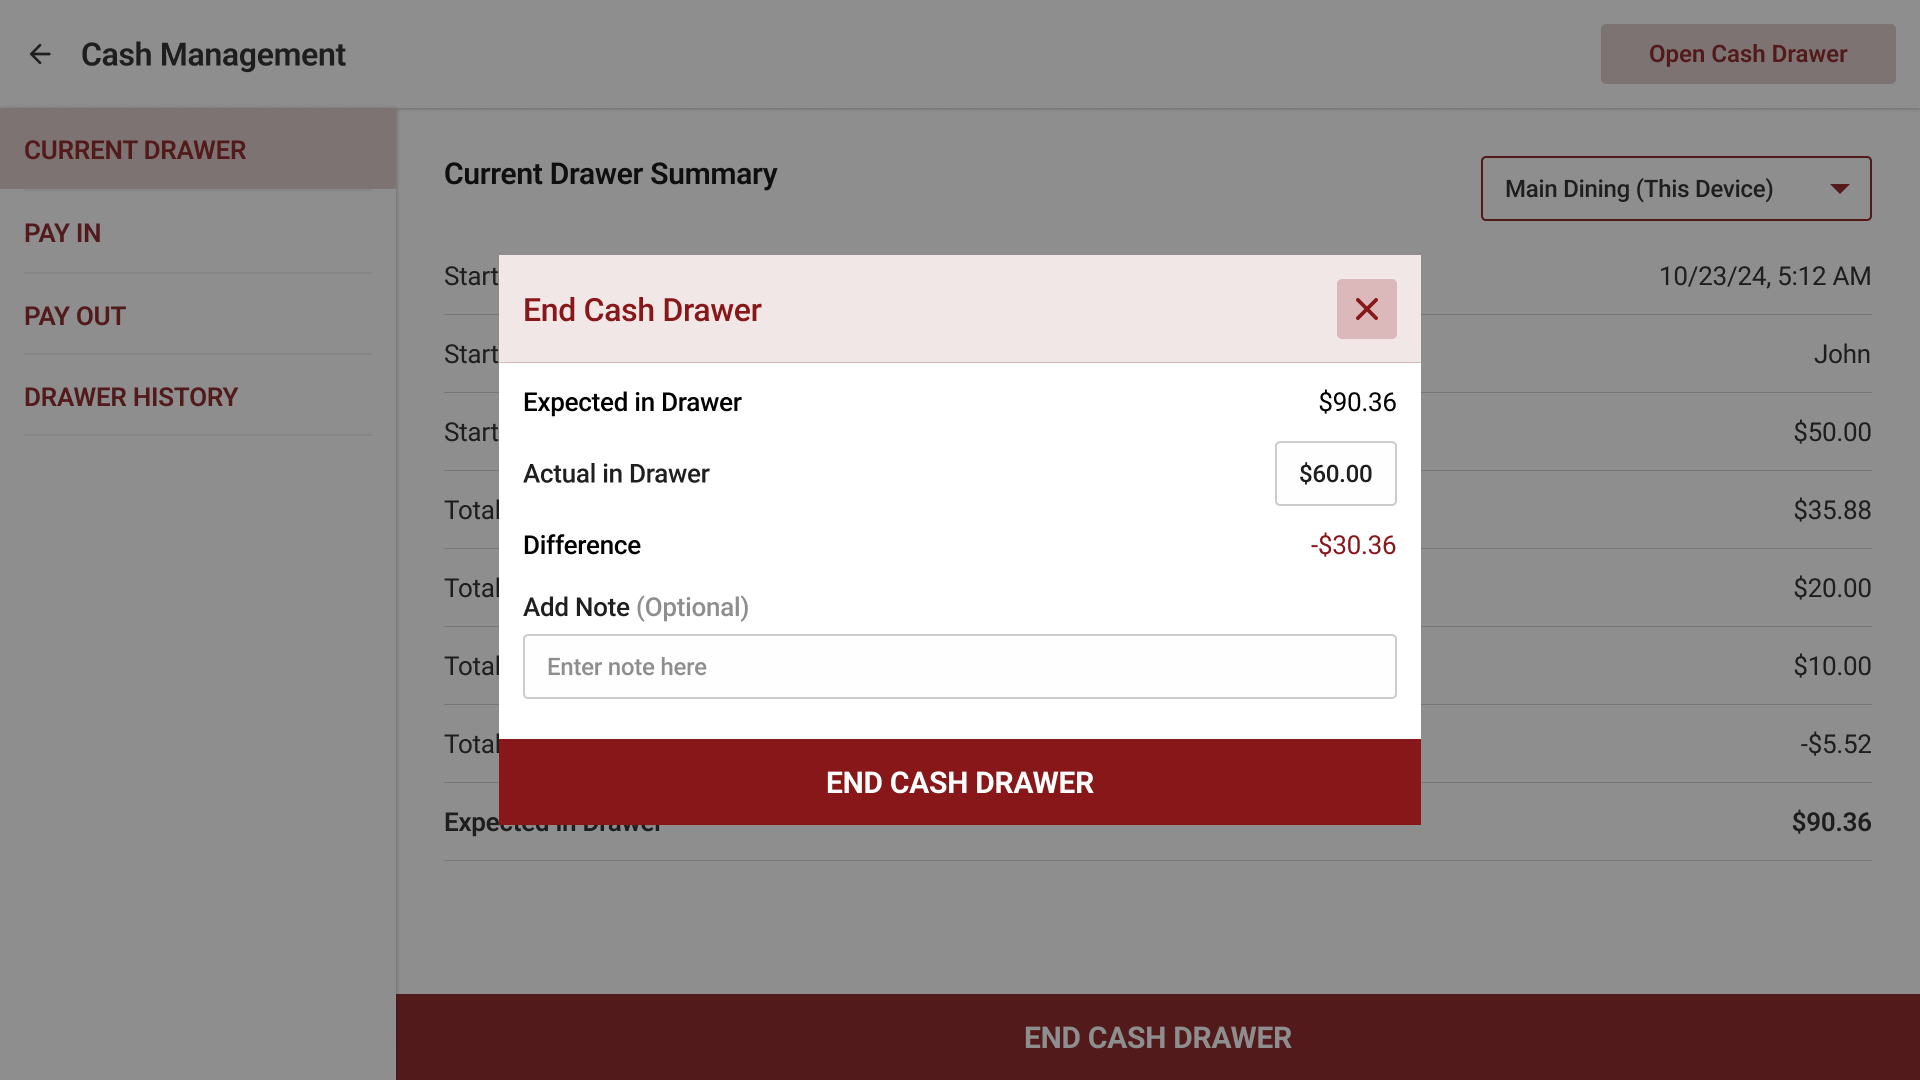
Step 4
If any additional information needs to be given, type it in the "Note" section and tap on "End Cash Drawer" button.
Step 5
Finally, tap on "Confirm".
If a Receipt printer is configured to the POS, a receipt can be printed with cash drawer summary once the cash drawer is ended
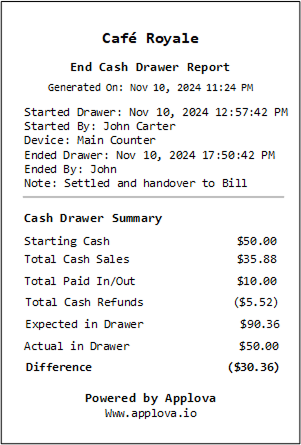
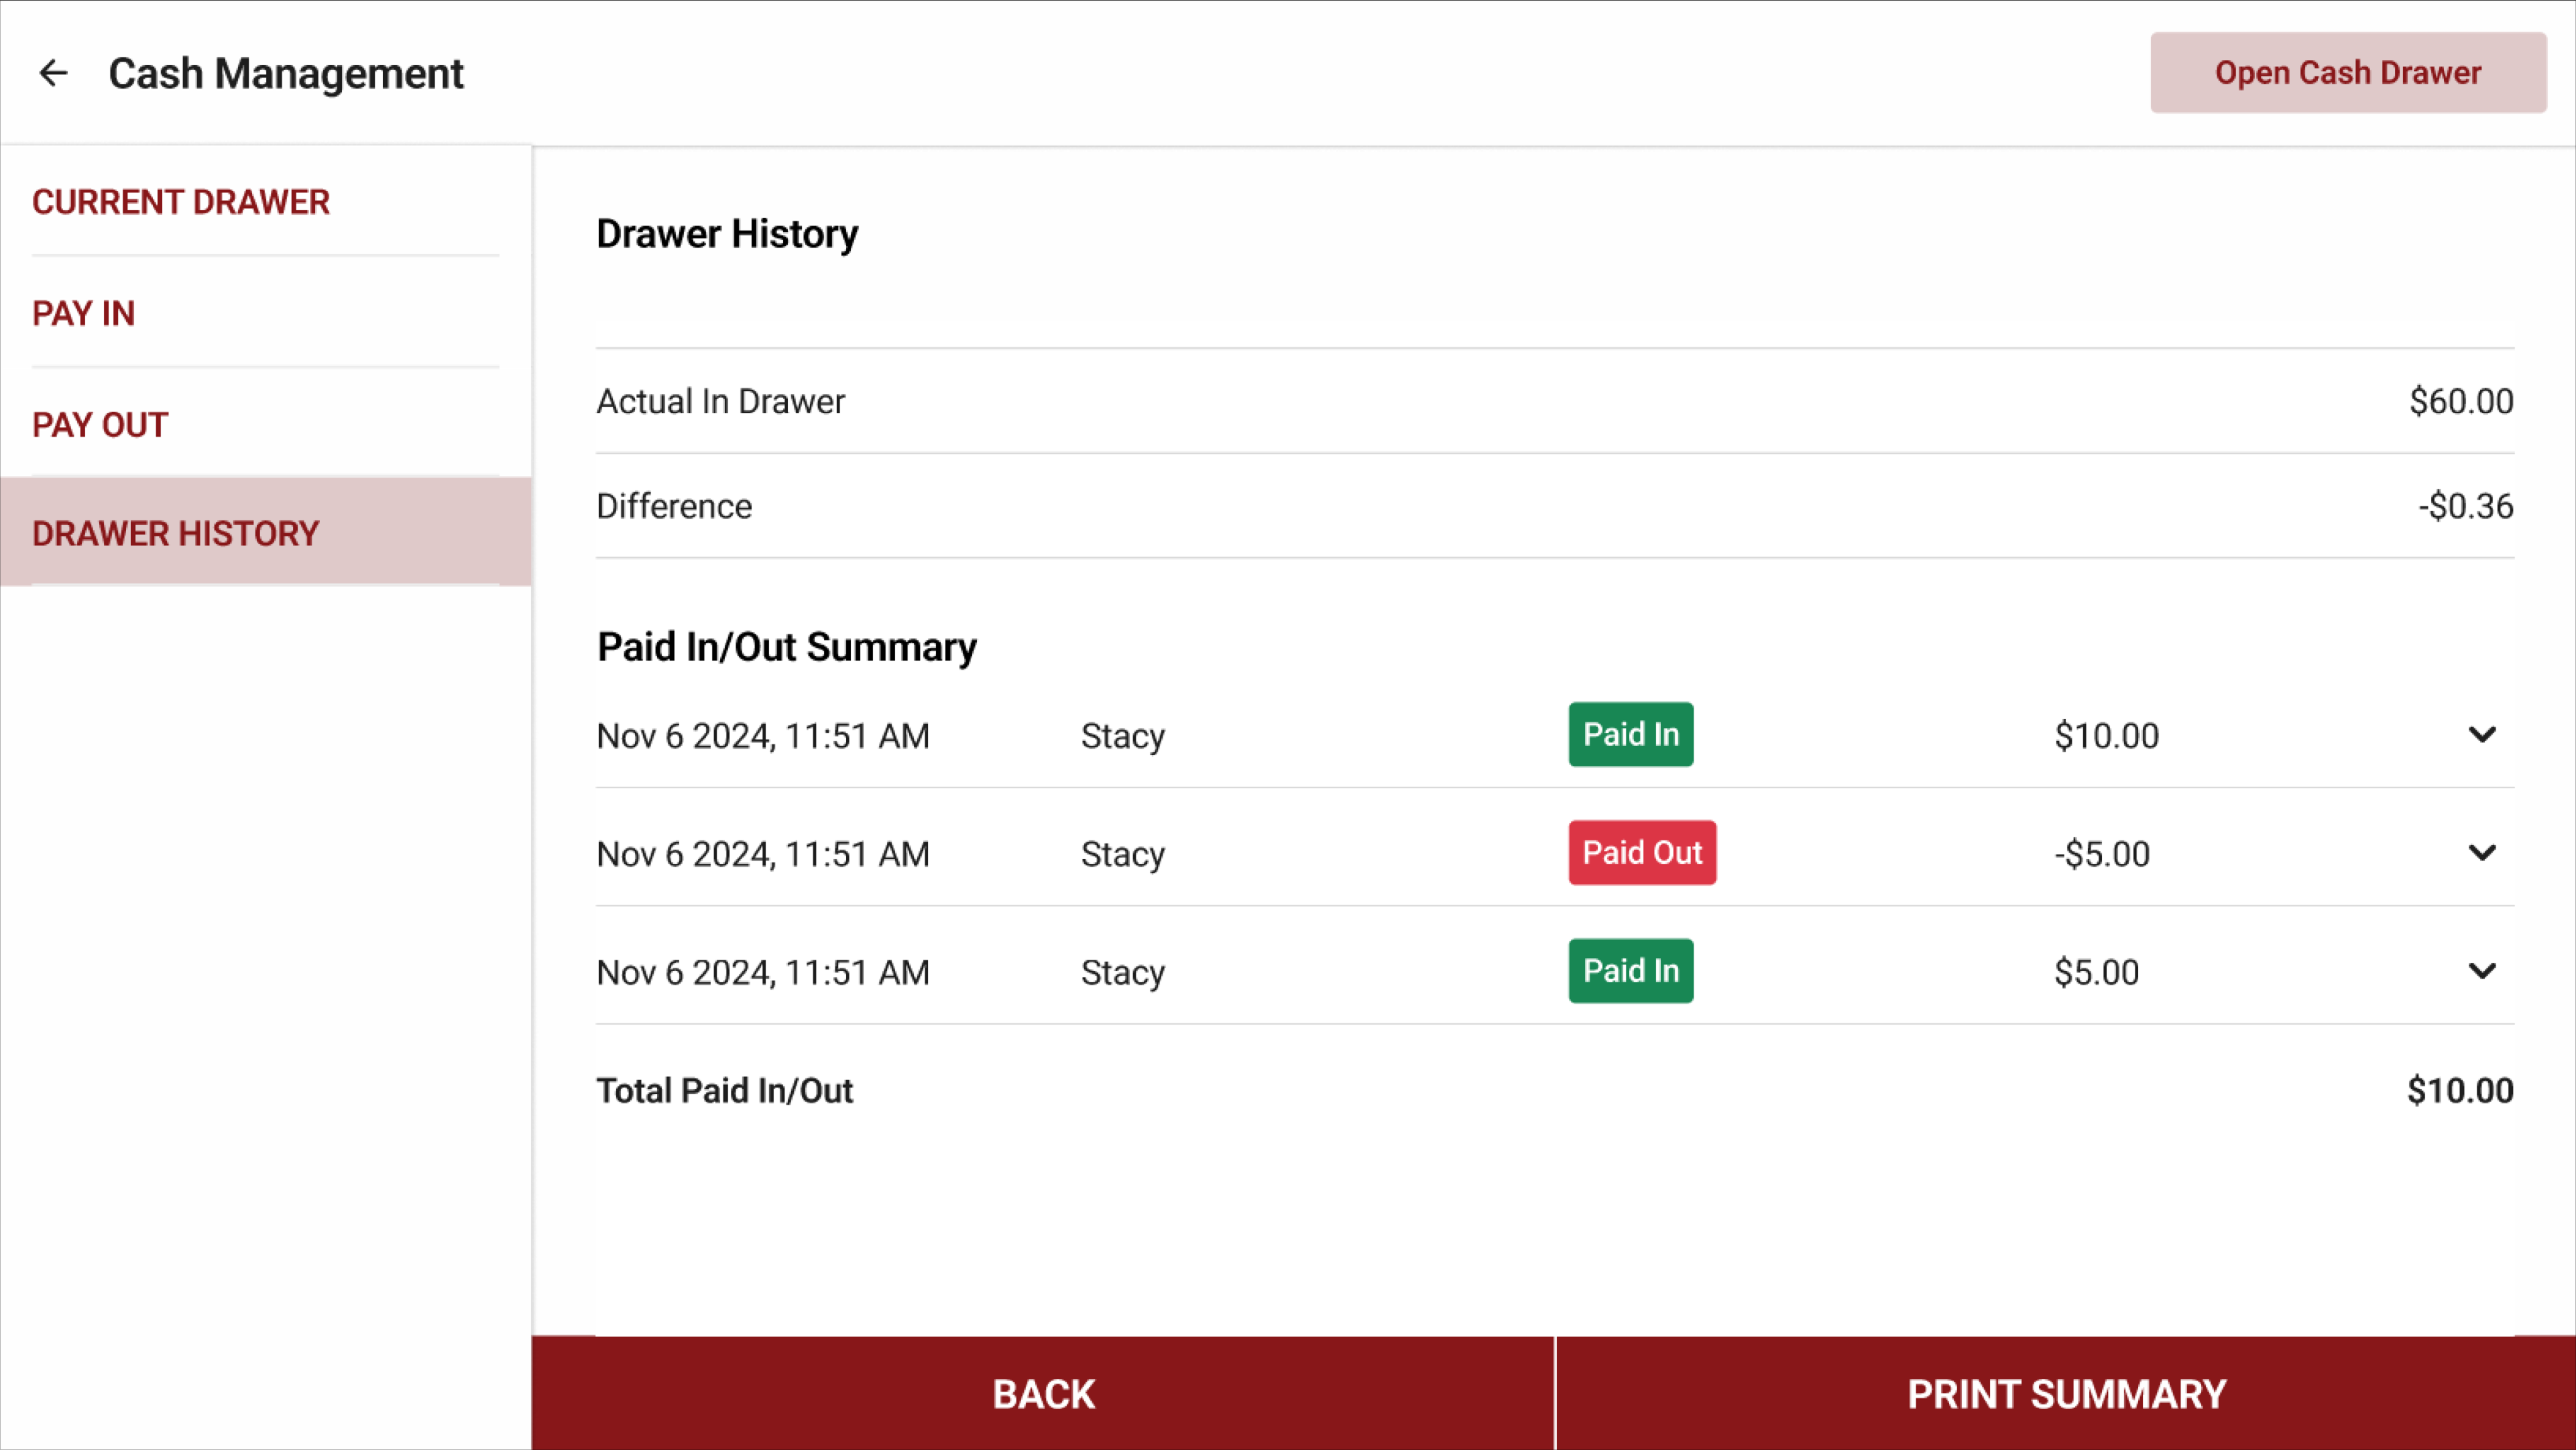
Cash Drawer History
A detailed summary of ended cash drawers can be viewed under the "Drawer History" tab. The list view displays the cash drawer ended date/time, device name, and the employee who ended the drawer. It also allows to view the Drawer History of other cash drawers associated with the business.
For a detailed view, tap on the arrow of an entry from the list.

The following will be displayed in the detailed view.
- Cash drawer started date/time and by whom
- Cash drawer ended date/time and by whom
- Total cash sales associated with the cash drawer
- Total Paid In
- Total Paid Out
- Total cash refunds
- Starting cash balance
- Expected in Drawer

If the "Total Paid In/Out" includes any paid-in or paid-out transactions, a "Paid In/Out Summary" section will be displayed. The following will be displayed in this summary.
- Date and time the cash drawer was opened
- Name of the employee who opened the cash drawer for a Paid In/Out
- Label indicating whether it was a Pay In or Pay Out
- Reason for the Pay In/Out transaction
How to Remotely View Multiple Cash Drawers?
If there are multiple cash drawers associated with the same business, a dropdown menu will appear in the top-right corner on all the tabs, allowing the user to select a specific device. The user can view the cash drawer summary of any other device in the business. However, "Pay In" and "Pay Out" sections will not allow to access other devices, only the current device can be viewed.
Users can only view cash drawer summaries remotely; however, they will not be able to end a drawer.
By default, the cash drawer summary for the default device will be displayed with the identification as "This Drawer" on the dropdown selection.

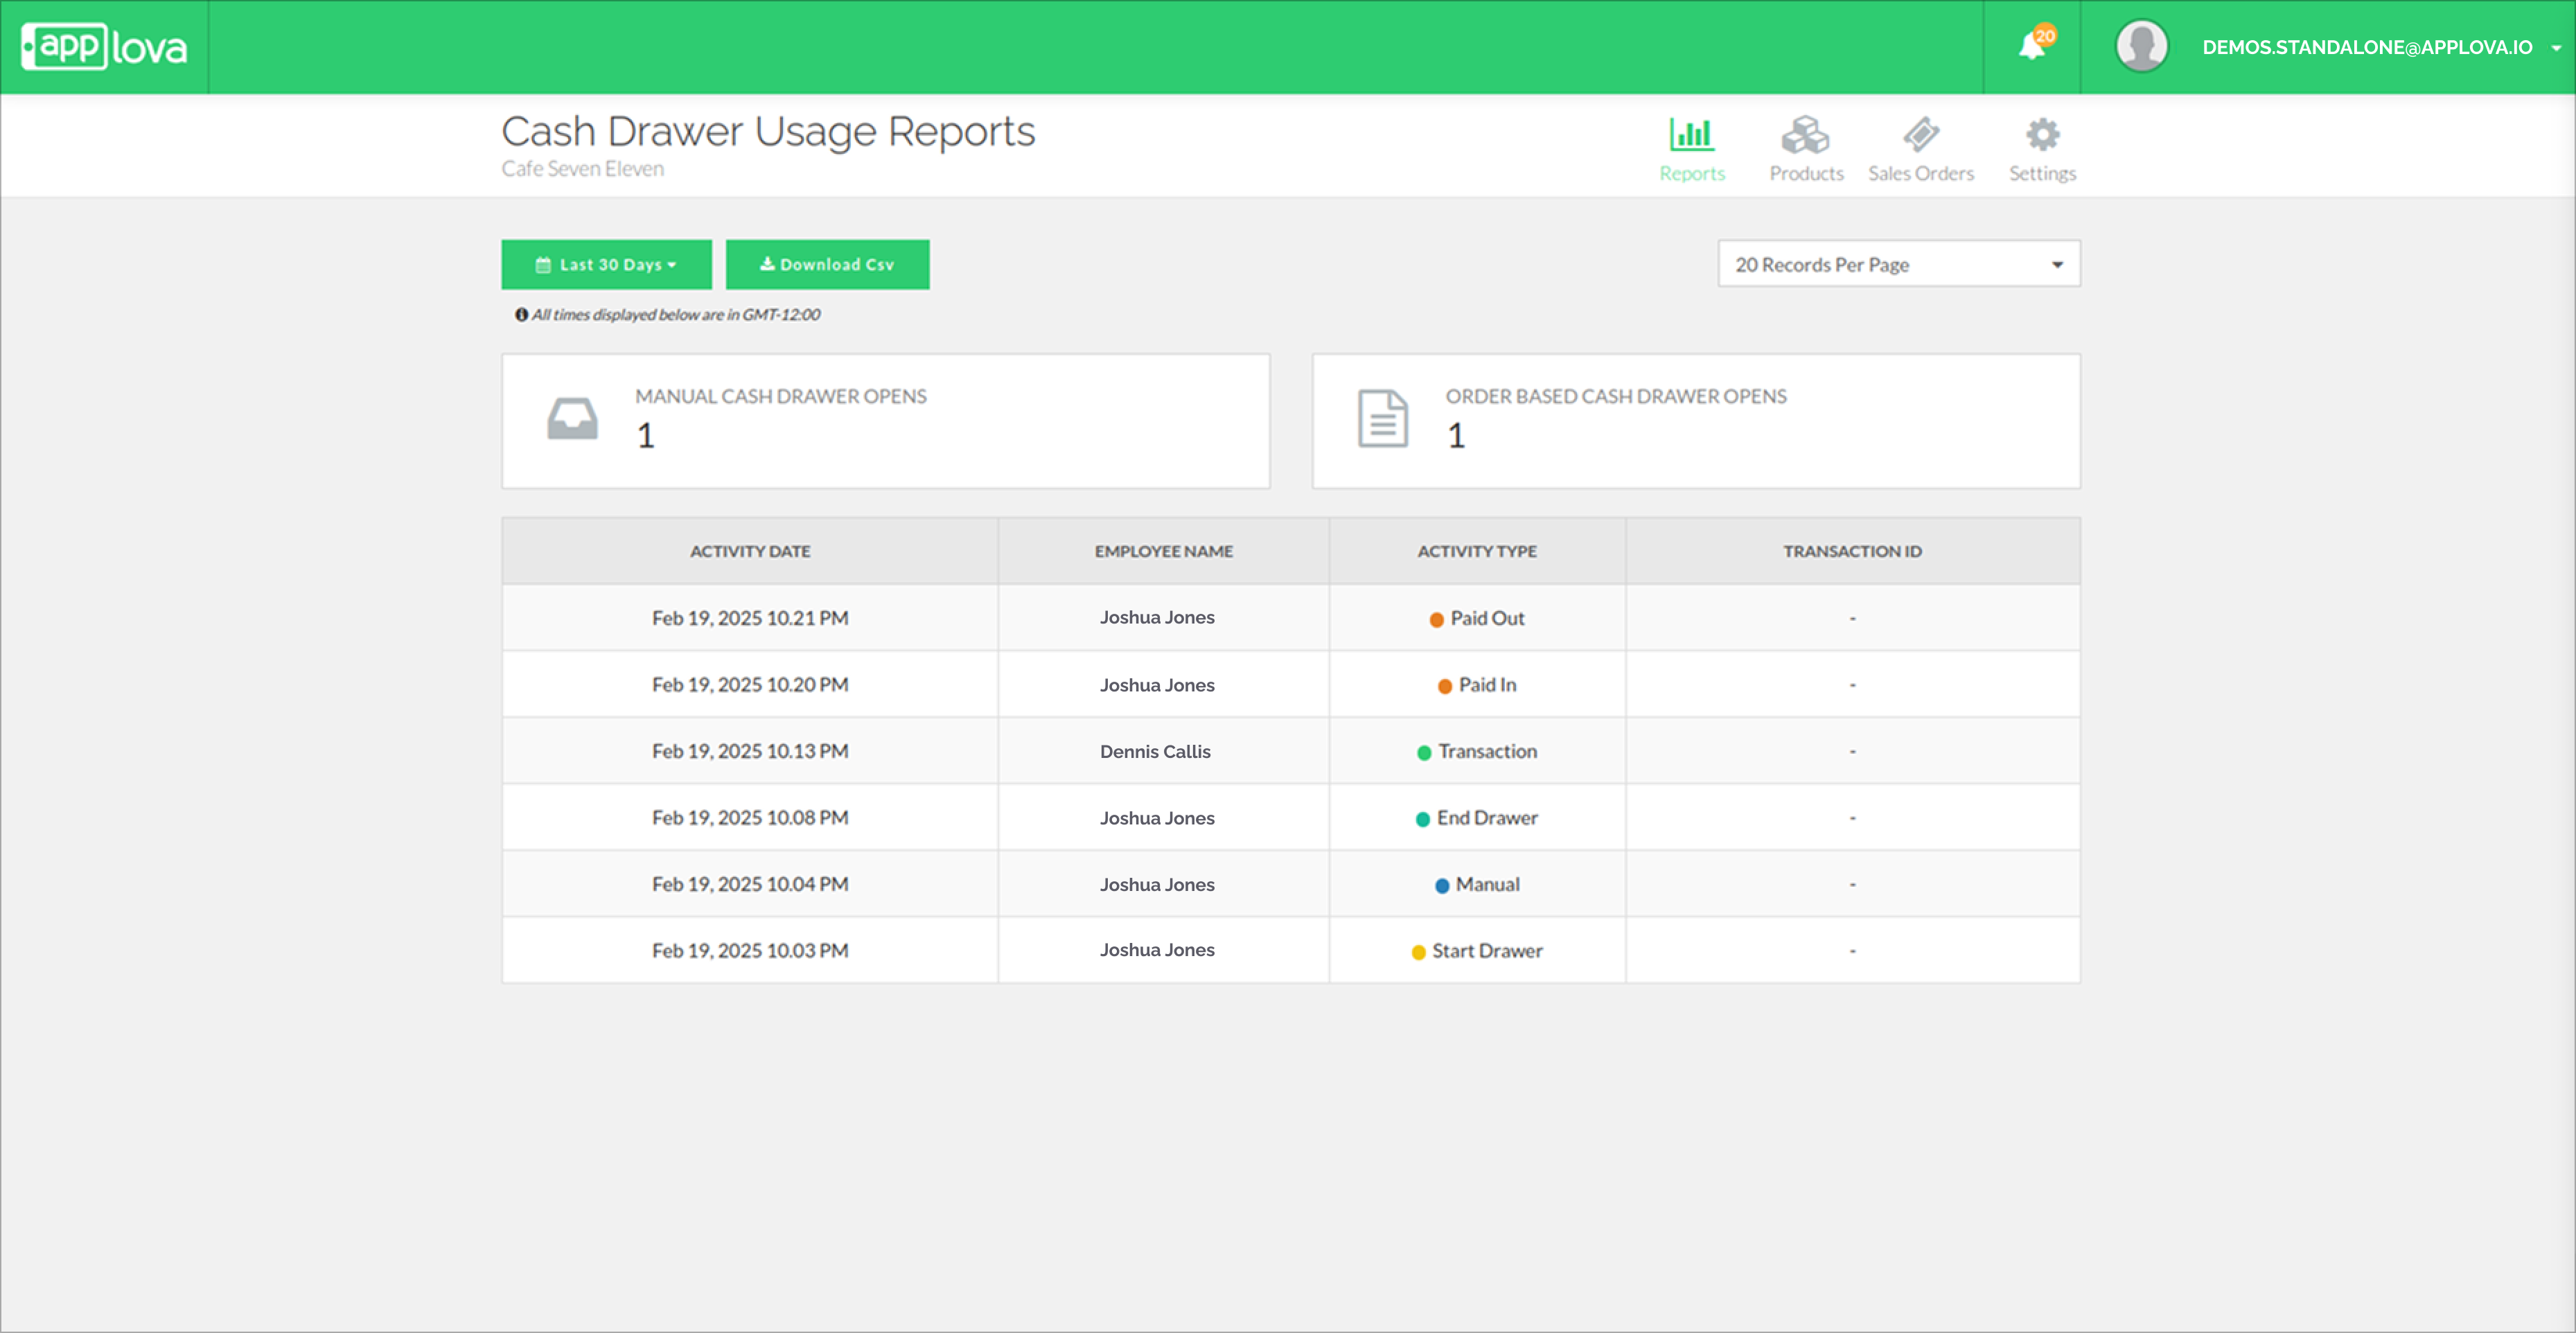
How to View Cash Drawer Usage Reports via Merchant Web?
Following activity types will also appear on the cash drawer usage report on Merchant Web apart from the activity types "Transaction" and "Manual";
Paid In: When the cash drawer is opened to deposit cash.
Paid Out: When the cash drawer is opened to withdraw cash.
Start Drawer: When the cash drawer is opened to enter the starting cash balance.
End Drawer: When the cash drawer is opened to close and reconcile the drawer.
Related Articles
How to Use Cash Payment When Paying the Order?
Supported Domains: Standalone Businesses With this feature, the order can be paid with cash. Step 1 Sign into "Applova POS" with the credentials of your business. Step 2 Then go to "Applova POS Register", and add items to the order and click "Proceed ...Fast Cash Option on Applova POS Cash Pay Screen
This feature introduces quick-select cash amount buttons on the POS cash payment screen, enabling cashiers to process transactions faster and more accurately. The Fast Cash buttons automatically calculate the nearest payment amounts such as the Exact ...Business Closeout Operations on Applova POS
Supported On: Standalone Supported From: Applova POS (1.79.0.RELEASE) What is a Business Closeout Operation? Closeout operations in a POS refer to the structured steps a business follows at the end of the day to finalize its sales activity. These ...AI Based Smart Product Recommendations on Applova POS
AI-driven product recommendations displays recommendations based on the customer's past purchases and the business's fast-moving products, when a customer is added to the order. This is a default feature available only for registered customers. Step ...Customer Profile on Applova POS
Supported Domains : Standalone Supported From : Applova POS (1.71.0.RELEASE) The "Customers" feature displayed on the POS dashboard displays the details of customers registered with the business. How to View a Customer's Details? Tap on a customer's ...